An email auto-responder can ensure your customers or readers get the best service possible. We all want that – great service.
You can’t possibly be logged on all the time and that’s where an auto-responder can be useful.
Before we go any further, I’m not talking about email service providers and automated email sequences.
I’m talking about how you handle requests that come through your contact email or contact forms. And this is where you would setup an email auto-responder.
Exactly What are Email Auto-responders
You might be more familiar with the term “Out-of-Office” notification. Basically, an auto-responder is a specific email response sent automatically when an email arrives in your inbox.
You then define how the response is used through:
- Identifying a timeframe
- Clarifying the scope (who will receive the response)
- Confirming frequency (how often will the same email address receive the response)
Which Email Services have Auto-responders
Email auto-responders have become almost standard over the years. They became heavily used in corporate office settings and then expanded.
You can find auto-responders in most of the major email services: Outlook, Gmail, Roundcube, etc.
What should be in an email auto-responder message
The two primary uses for email auto-responders are:
- Out-of-office notifications
- Level-setting expectations – ensuring the sender understands what to expect when they send you an email
The second point is my focus today as it’s critical small businesses and, most importantly, online businesses use this feature. For many customers or readers, this is their first introduction to your business. You want them to have the information they need as quickly as possible. And you want them to feel comfortable communicating with you.
Setup an Email Auto-responder
I’m going to walk you through some examples covering the two big services, Outlook and Gmail, but also Roundcube. Roundcube is one of the webmail options commonly used when you setup email with your hosting provider.
Outlook
There are two sub-categories for Outlook. I’ll show you both the client version (what you would download onto your computer) and the webmail version (used through a browser).
1. Outlook Client
Prefer video with captions/subtitles? Watch on YouTube:
Don’t like video? Read the text instructions below.
1. From within the Outlook client, in the upper left corner, click “File”
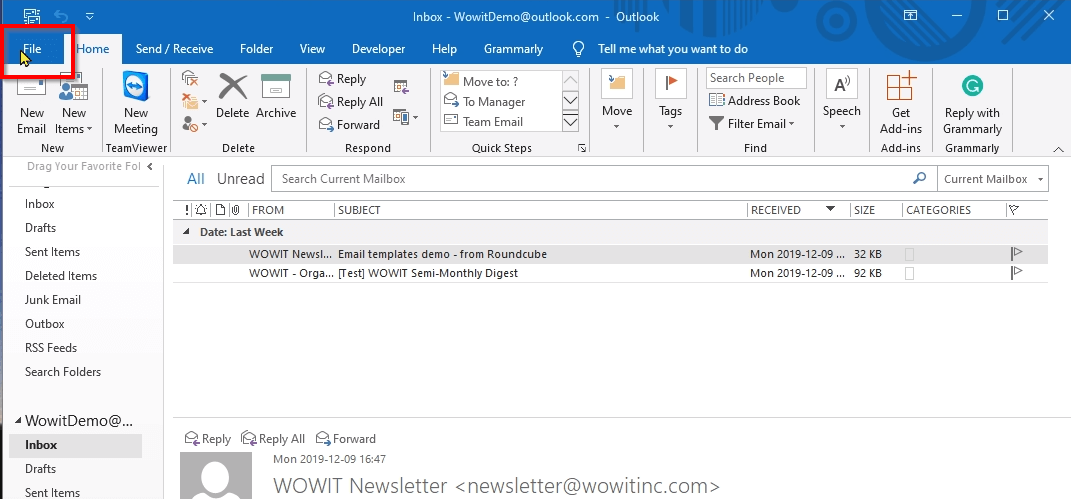
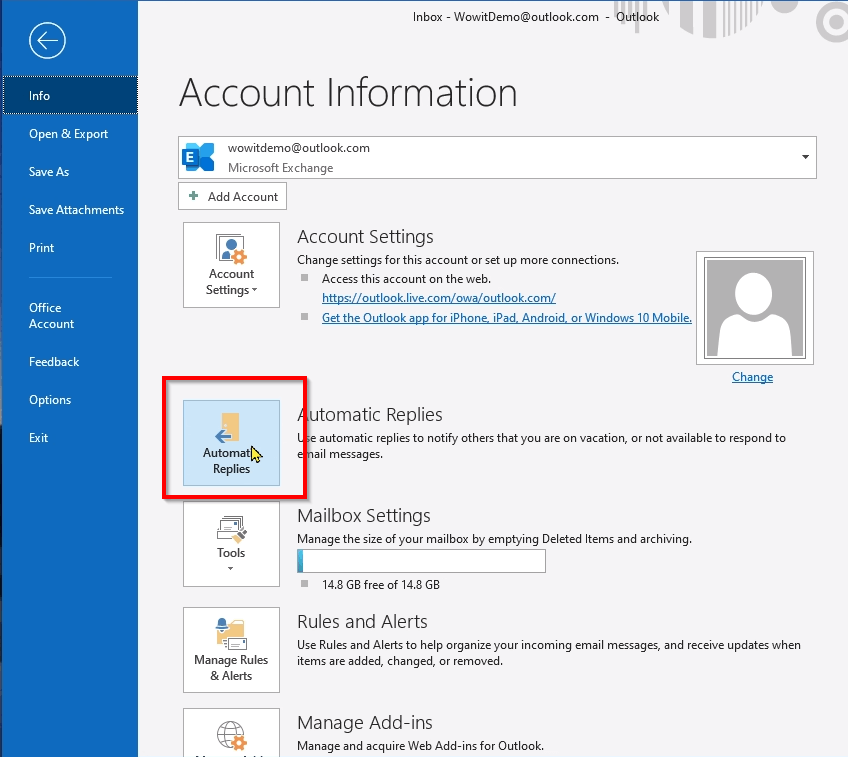
2. Select “Automatic Replies”
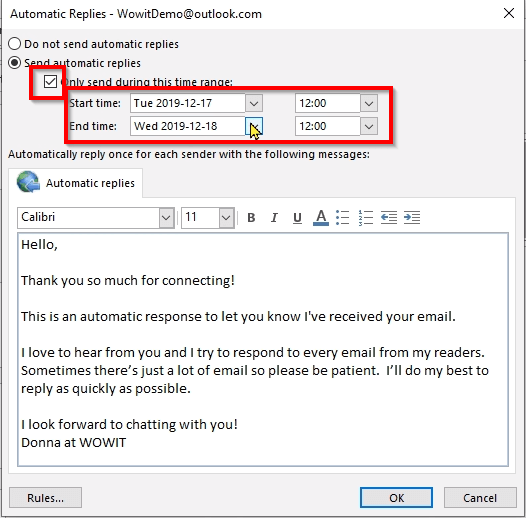
3.1) Select “Send automatic replies”
3.2) Click within the “Automatic replies” sub-window
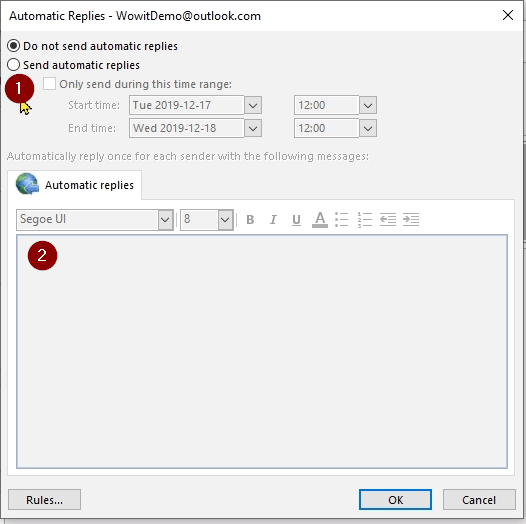
4. If you want, you can modify the timeline for the reply. Click the checkbox for “Only send during this time range” and then adjust the date and time options.
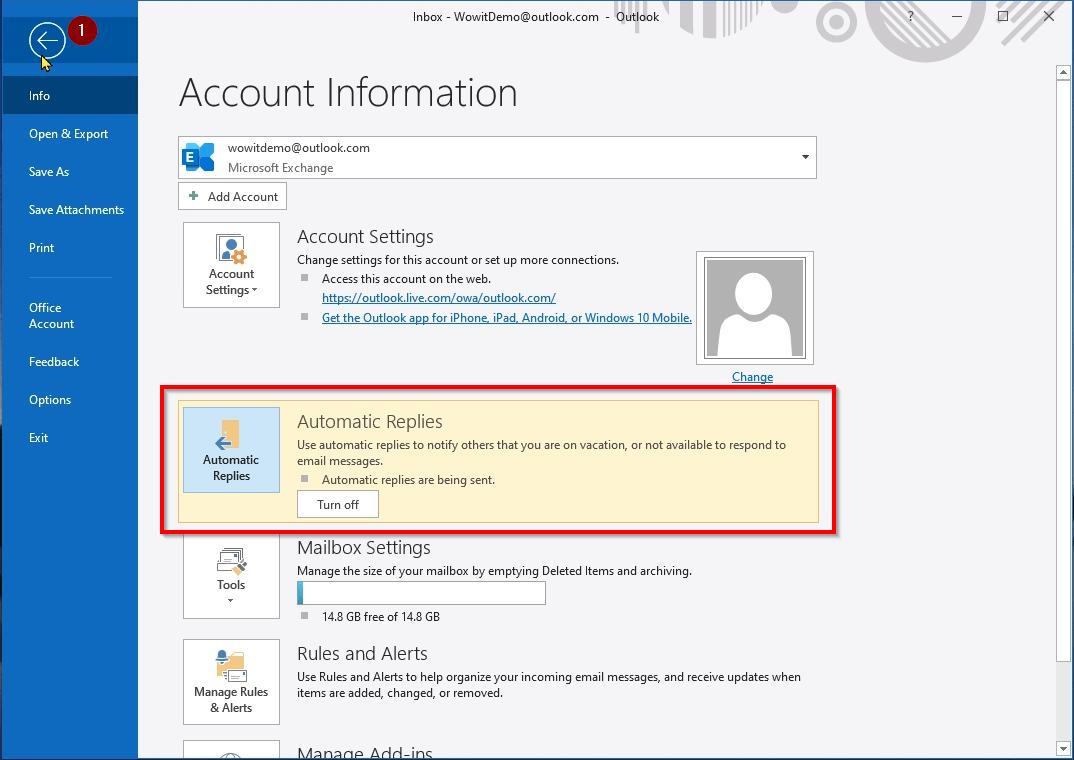
5. Click “OK” and you’ll now see the “Automatic Replies” section is highlighted in yellow. From the upper left corner, 1) click the left arrow to return to the inbox view.
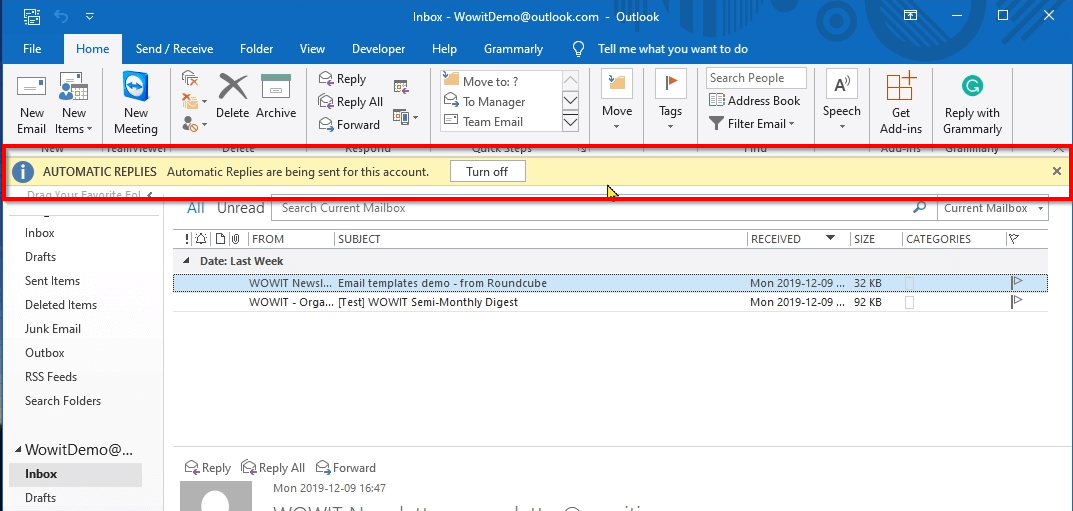
6. Now the notification bar appears so you know automatic replies are enabled
2. Outlook Webmail
Prefer video with captions/subtitles? Watch on YouTube:
Don’t like video? Read the text instructions below.
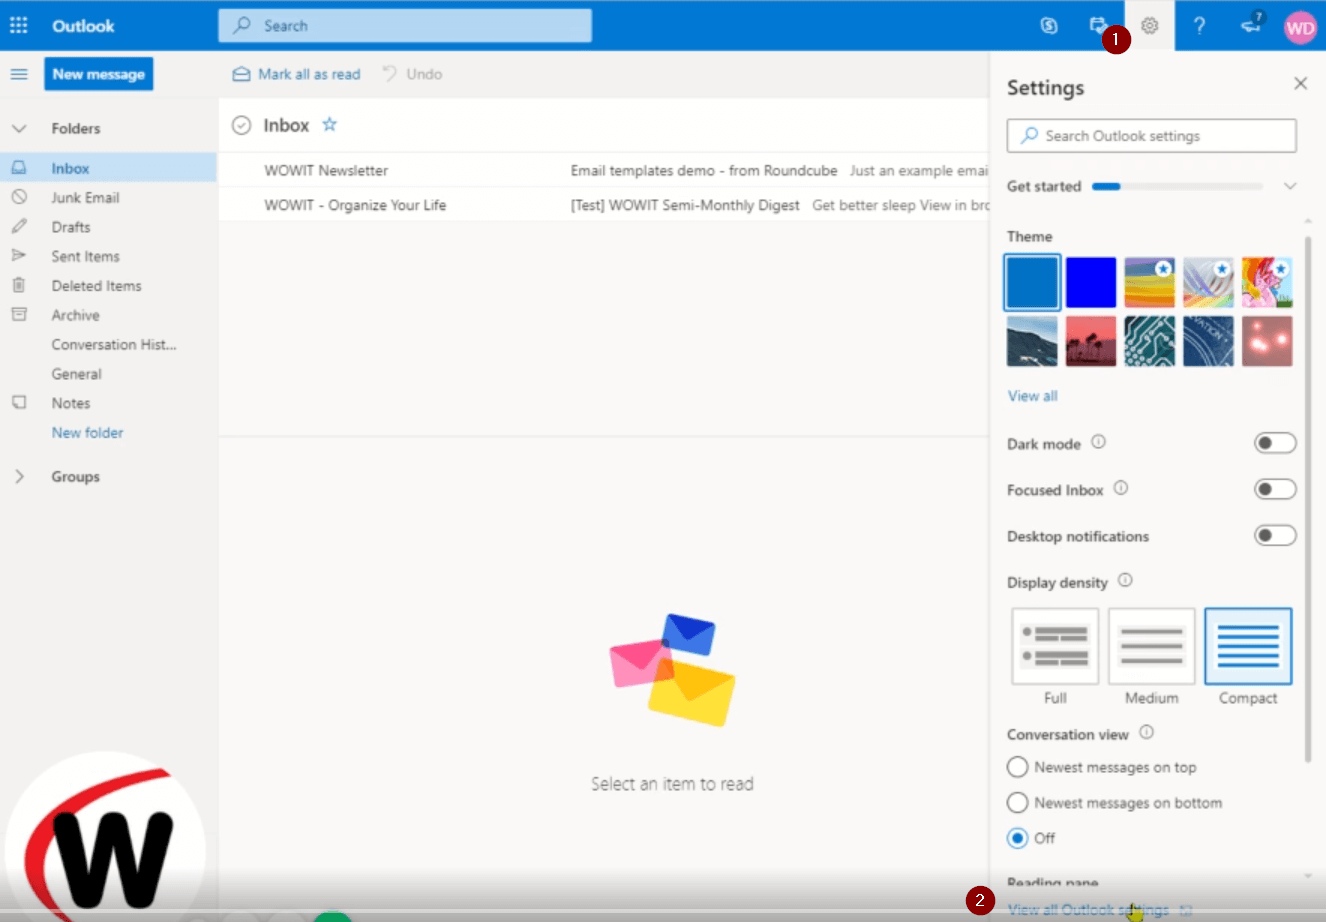
1. From the gear icon in the upper right corner:
1.1) Click “Settings”
1.2) At the bottom of the panel click “View all Outlook settings”
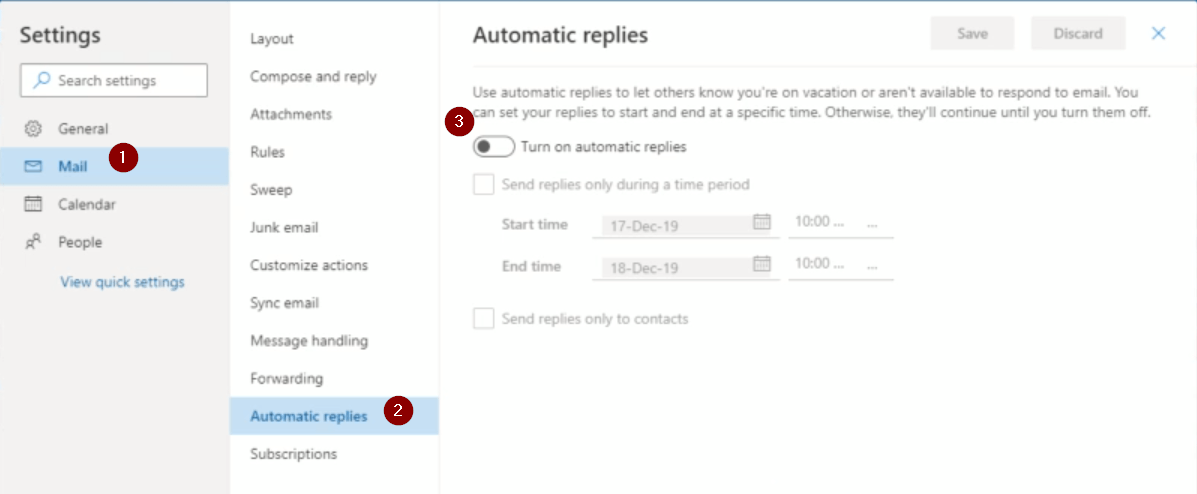
2.1) Ensure “Mail” is selected in the far left “Settings” panel
2.2) Choose “Automatic replies” under the “Layout” panel
2.3) Click on the toggle to “Turn on automatic replies”
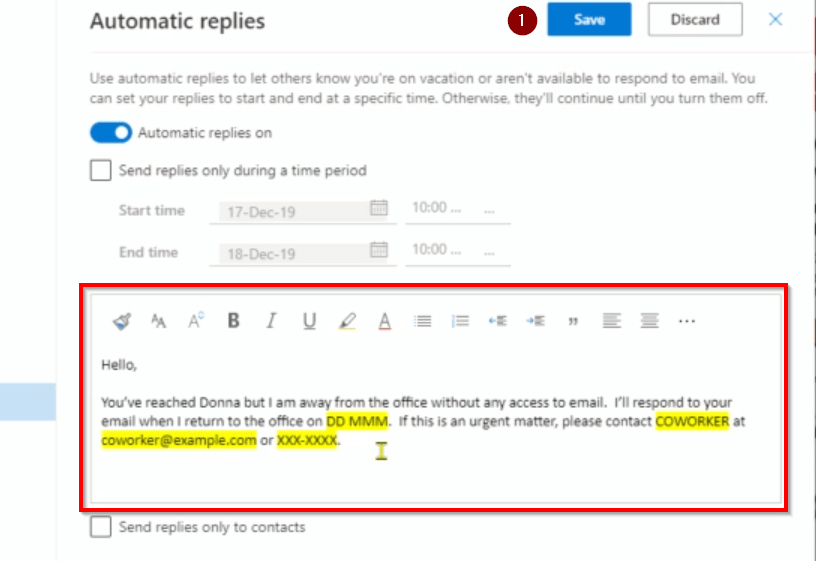
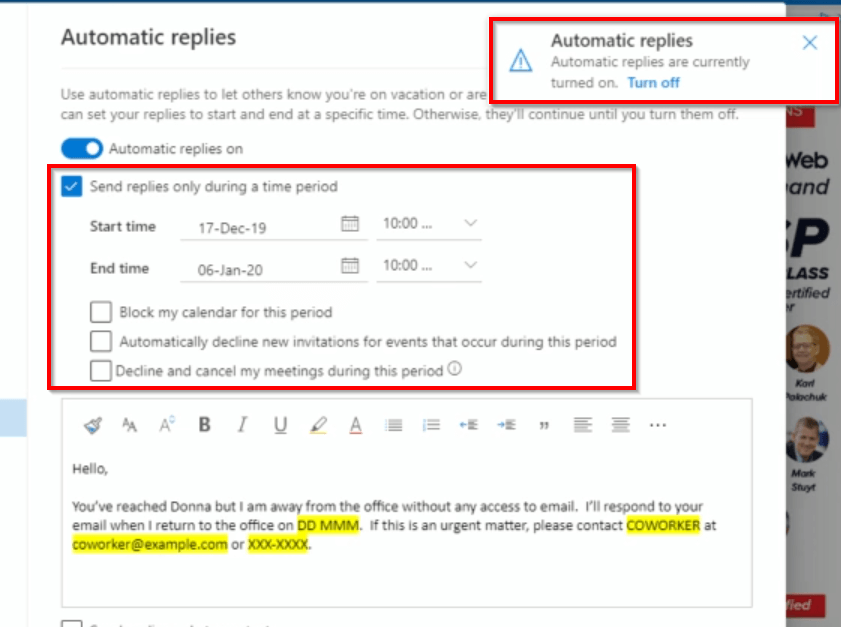
3. Insert the text and then you can 1) click “Save”. Or you could adjust the timeline. Select the checkbox “Send replies only during a time period.” After you save, a notification appears in the upper right so you know it’s been enabled.
3. Gmail
Prefer video with captions/subtitles? Watch on YouTube:
Don’t like video? Read the text instructions below.
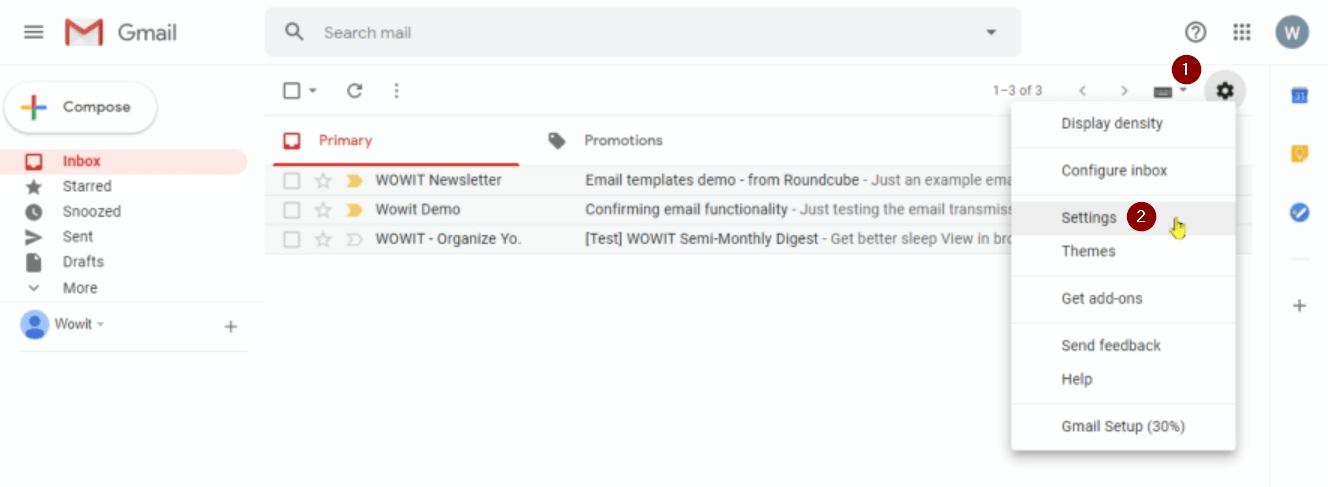
1. From the 1) gear icon in the upper right corner 2) click “Settings”
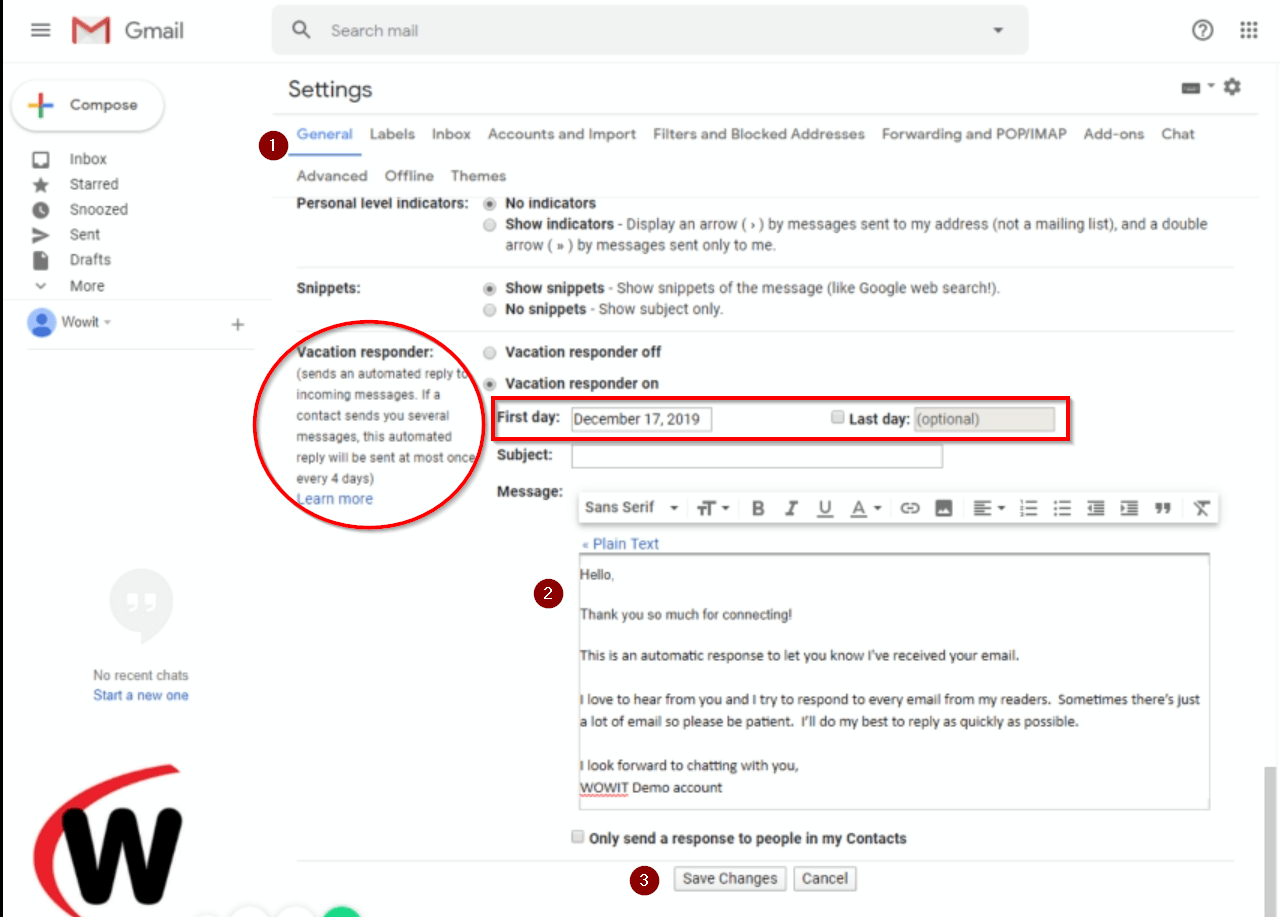
2.1) From default sub-menu “General”, scroll down to the “Vacation responder” section at the bottom.
2.2) Insert the text you want
2.3) Click “Save Changes.”
You could also adjust the timeline settings before you save.
NOTE: Gmail sends an automated response once every 4 days at a maximum.
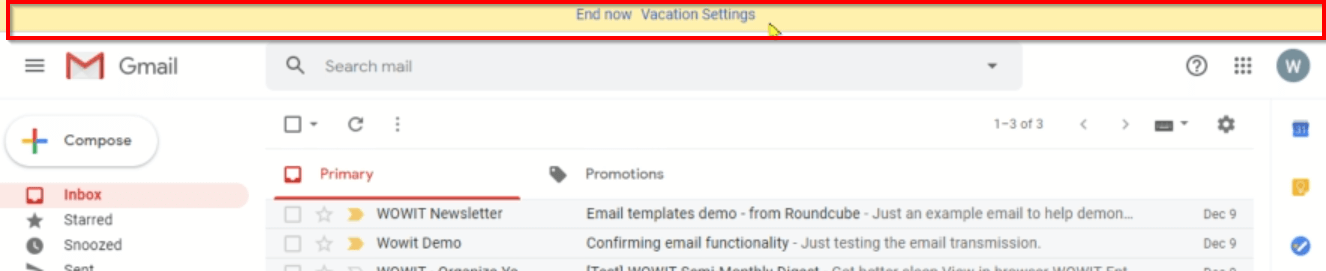
3. Once you’ve saved, you’ll see the notification bar in yellow background displayed so you know the settings are enabled.
4. Roundcube
Prefer video with captions/subtitles? Watch on YouTube:
Don’t like video? Read the text instructions below.
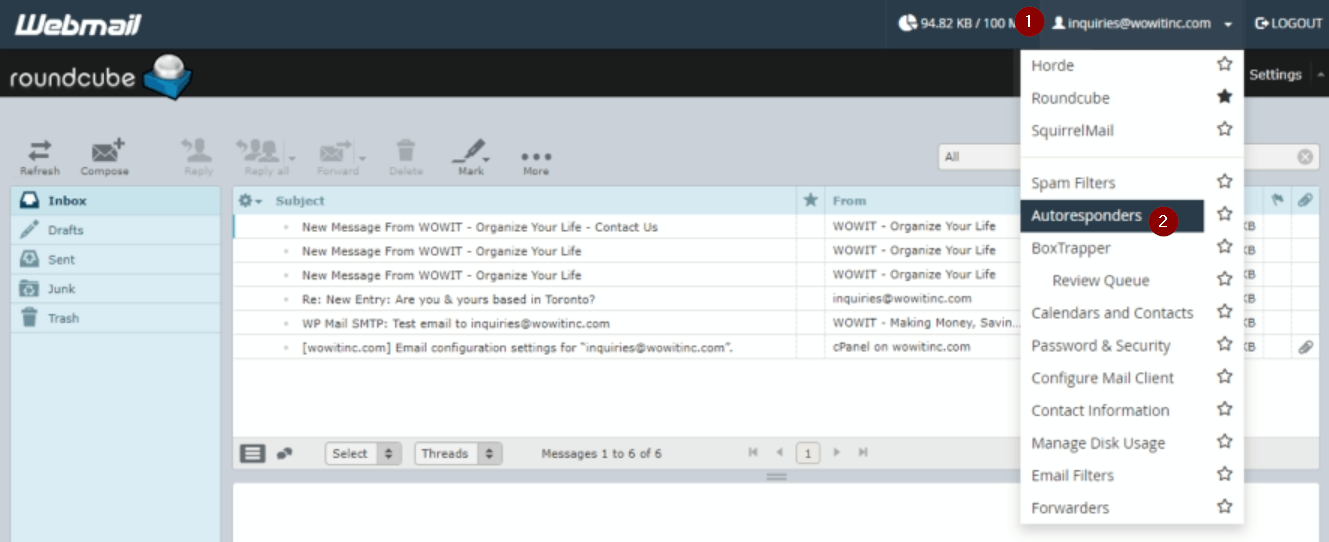
1.1) From the upper right corner click on the email address
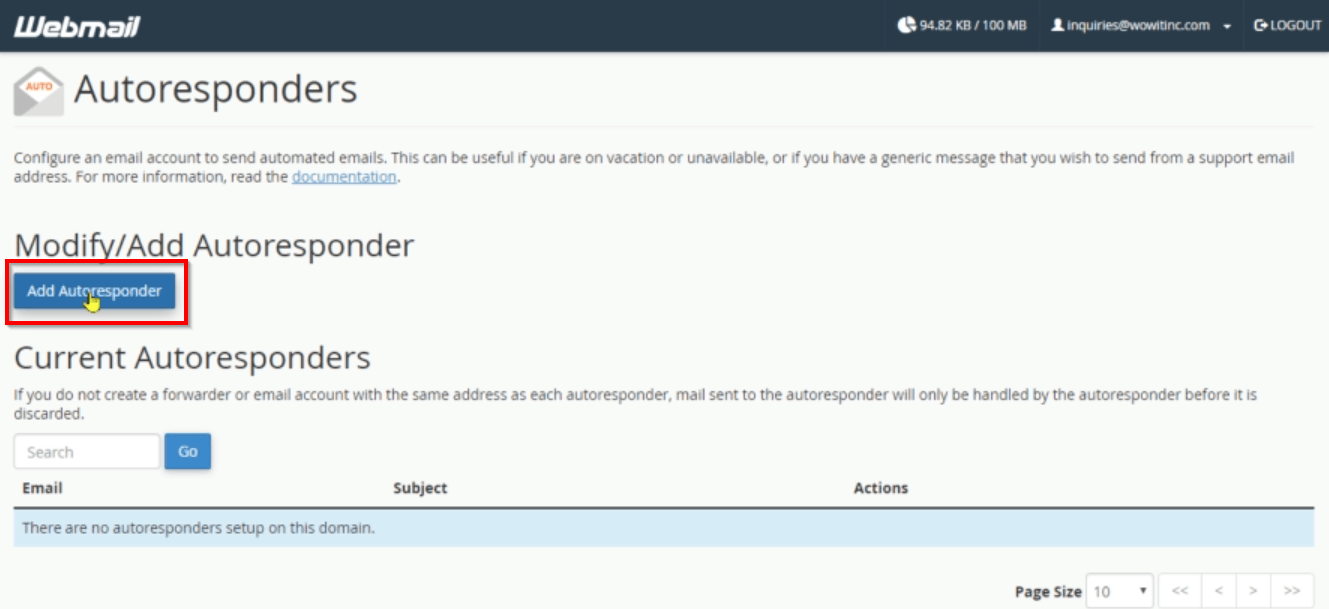
1.2) Select “Autoresponders”
2. Click the “Add Autoresponder” button
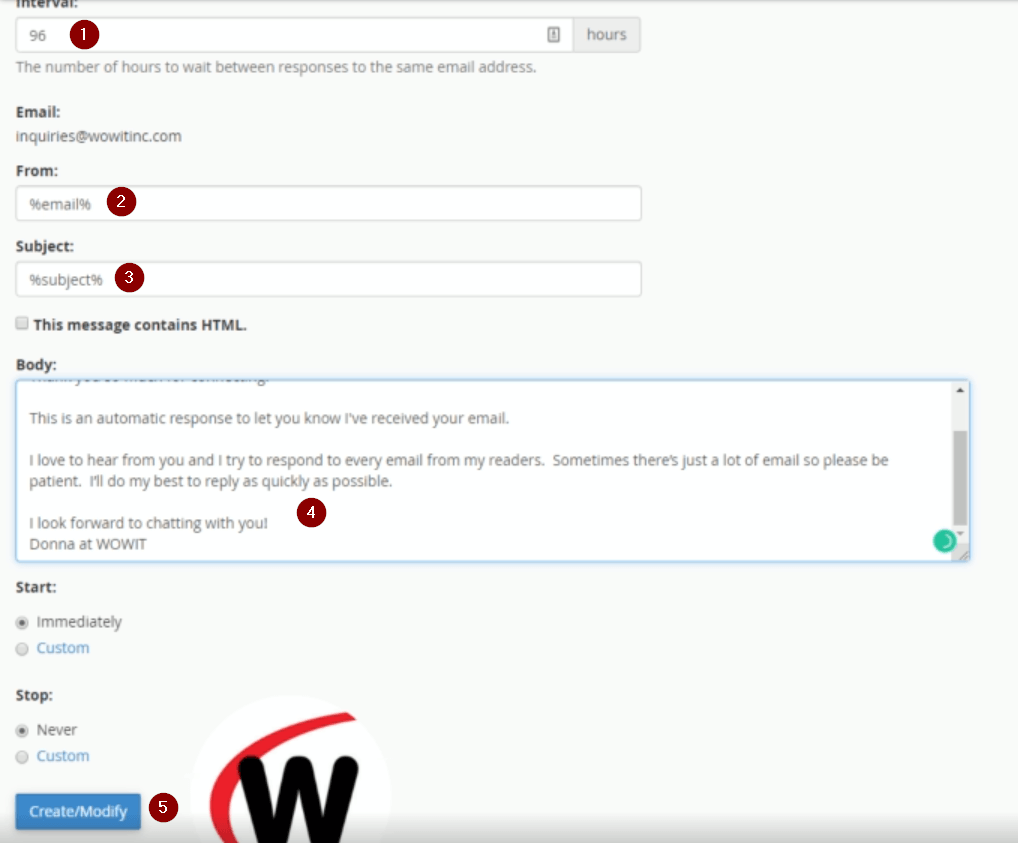
3.1) Enter the response interval in hours
3.2) Type the variable reference for the sender (From) email
3.3) Enter the subject reference
3.4) Insert the text for the response
3.5) Click the “Create/Modify” button
NOTE: Information regarding how to use the variables is displayed higher up on the setup page – refer to the video.
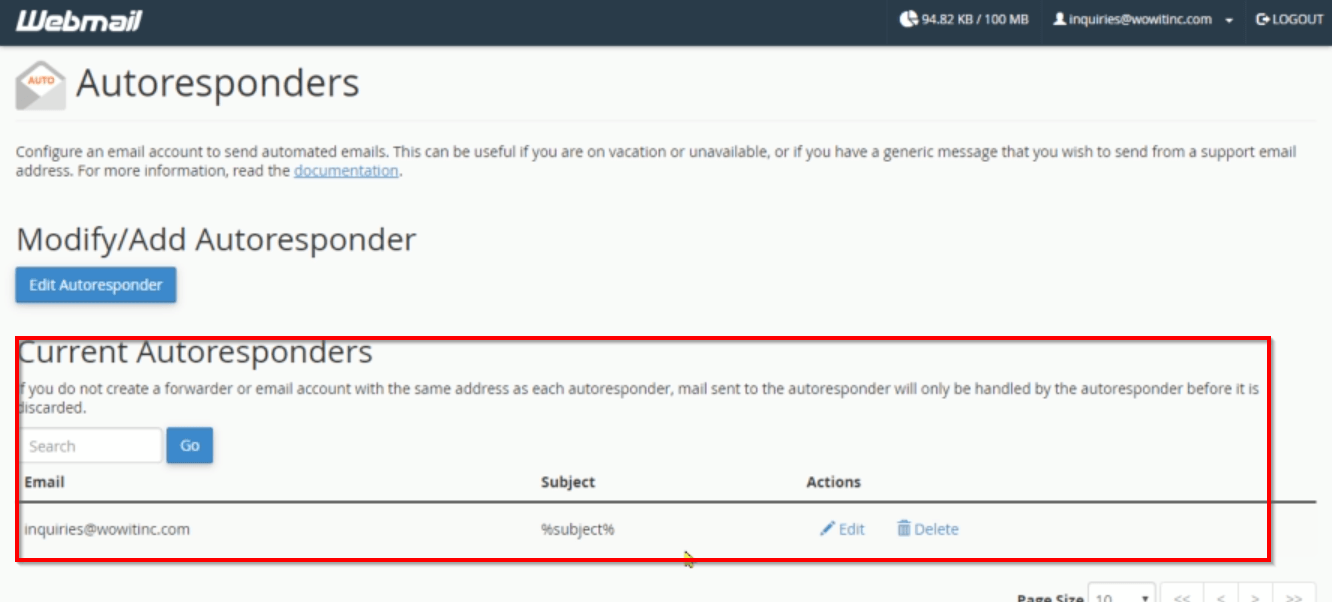
4. After you’ve saved, you’ll see the success message. Then if you return to the list of Autoresponders, you’ll see the new item.

Summary
Now you’re ready to package your own auto-responders. Your first step is to figure out the best wording for your purpose. Once you have that, you’re ready to create.
Remember to include a timeline for your response. And ensure you can consistently meet that timeline. Then you might add some information about your services or references to other articles.
Once you’ve completed the setup, don’t forget to enable and then TEST. You want to be absolutely certain they’re functioning properly. This will make you more helpful and your customers will understand what to expect. Win-win.
Want to learn about another method to improve your customer response? Read about how to use email templates.
Like This Post? Put a Pin On It!

Did you find this article useful and helpful?
Share this WOWIT post on social media!
Have some suggestions of your own?
Click the Submit Comment button below to let us know!
Want More?
Would you like to learn more about this topic? Or perhaps explore some other topics? Choose from one of the categories below to see more:
Subscribe to our newsletter to have information delivered right to your inbox.