Your WordPress settings are an important part of your website setup.
But should you accept the defaults? If not, what should you change?
There are many different options to consider. I’ll outline the most important items to evaluate before you make your site available to the public.
You’ll learn some basic terminology and how you can preview your changes. I’ll highlight the WordPress defaults and provide recommendations for updates. And, perhaps most importantly, you’ll understand the reasons behind the suggestions.
Approach Strategy
Take some time to understand the different elements. There are a LOT of settings and so many options.
Don’t try to change everything all at once.
My recommendation – take screenshots of all your current settings. Then take a screenshot of your website preview – this is the view the public will see when your site is live.
Make just one change at a time and see what difference that makes in the preview. In this fashion, you’ll work through all the options plus understand their results.
Then, you can make informed decisions for yourself. Plus, if something goes wrong later, you’ll know how to revert to the original settings.
NOTE: Throughout this post I’ve added many screenshots. And a lot of those were taken from a demo site: opensourcecms.
WordPress Settings – Terms and Concepts
If you’re new to WordPress (and you probably are if you’re reading through this article) there are a few terms and concepts that might need explanation:
1. Menu – contains the navigational elements to help you move around a website. This is pretty standard with websites and something with which you’re quite likely already familiar.
2. Post – one individual article, like an essay
3. Page – this is very similar to a post. However, it’s best used for timeless information – content that is always relevant. For example, “About Us” page, “Contact” page, “Privacy Policy” page, etc.
4. Theme – a WordPress theme controls the layout of your website. Themes determine where and how information appears.
As you sort out which settings work best for you, I suggest you stick with a default theme. Once you’re more familiar with the settings then you can start your hunt for the perfect theme. And I’ll write an article for that too!
5. Sidebar – this is a vertical display section on the right or left of your main content area
6. Widget – an element typically designed to be embedded inside a sidebar
7. Plugin – extra code packets to provide more functionality but without requiring you to write your own code
Before You Start Making Changes
Just a few more points before you jump in and start changing everything. Because I know you want to!
WordPress Password Change
Change your password. It’s likely you’re using a default password that was set up for you when you installed WordPress. And, if that’s the case, then you need to change it.
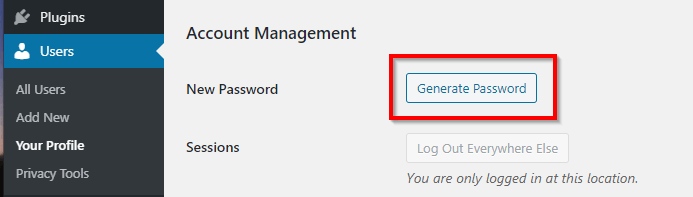
- From the left vertical navigation panel, select “Users” and then “Your Profile”
- Beside “New Password” click the “Generate Password” button
- When the new password is displayed, store it somewhere!!! Password Management software like LastPass is a really great option.
- Save the new password by clicking the “Update Profile” button at the very bottom of the screen
After you change it, logoff and login again to ensure it works.
Ensure Your Installation is Current
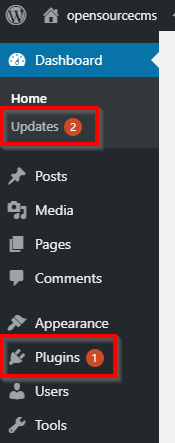
Your left vertical navigation panel will usually give you cues if there are updates available. Red circles with numbers will appear to denote the number of updates available.
These could appear under Dashboard -> Updates or under Plugins.
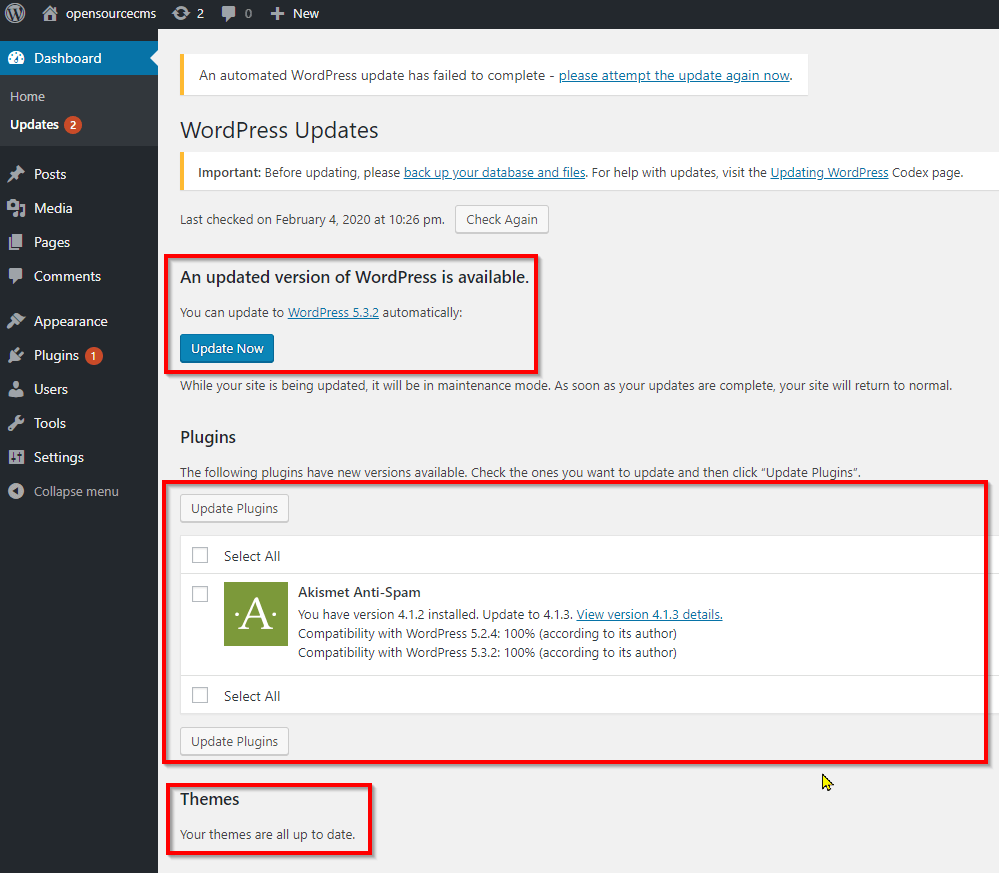
Your WordPress version can be updated by clicking the “Update Now” button in the WordPress Updates section.
And your plugins can be updated by checking the “Select All” checkbox and clicking “Update Plugins” in the Plugins section.
Updating Themes is performed in a similar manner.
Site Preview
To see how your site will look to others when it’s publicly available:
- At the top of your screen, on the left side, look for the house icon with the name of your site next to it.
- Clicking on that icon/site title will show you your site as it would appear to the public.
- Use the browser back button to return to your WordPress backend administration area.
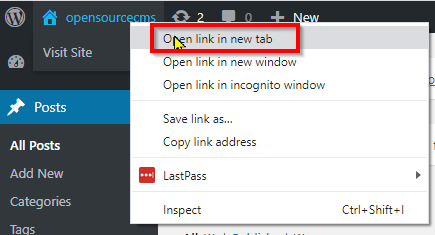
I prefer to open the preview in a new browser tab. That way I can still see my WordPress settings.
If you’re using the Chrome browser then right-click the home icon/site title and select “Open link in new tab”:
Default WordPress Elements
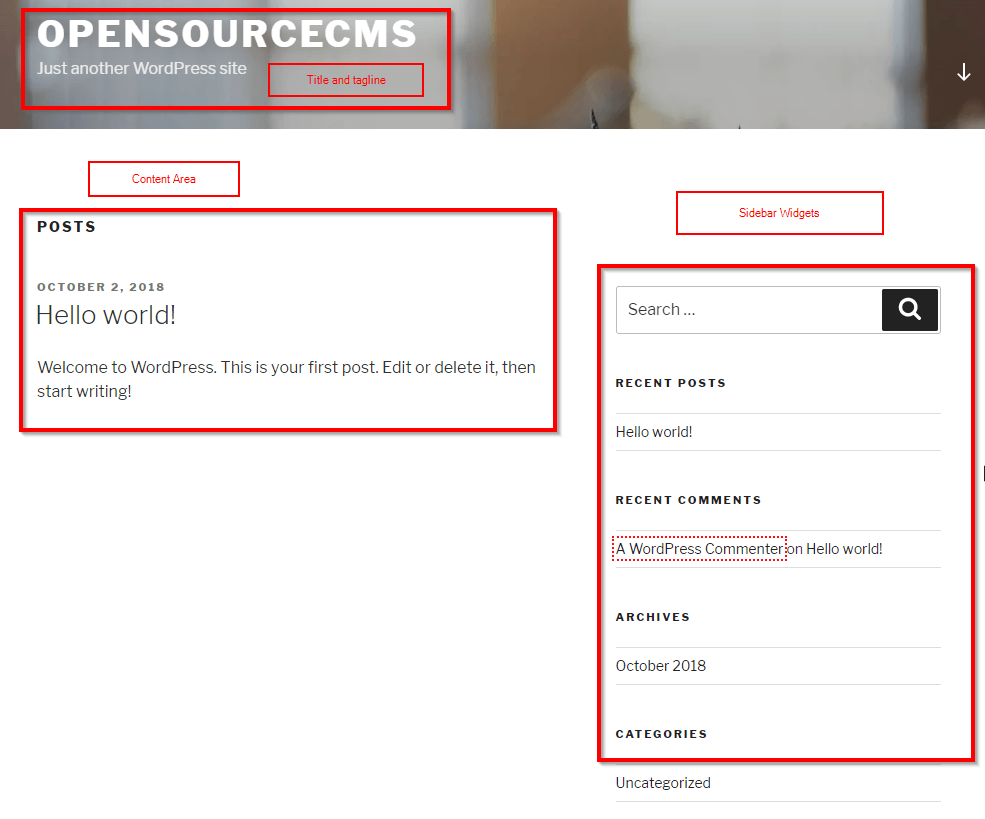
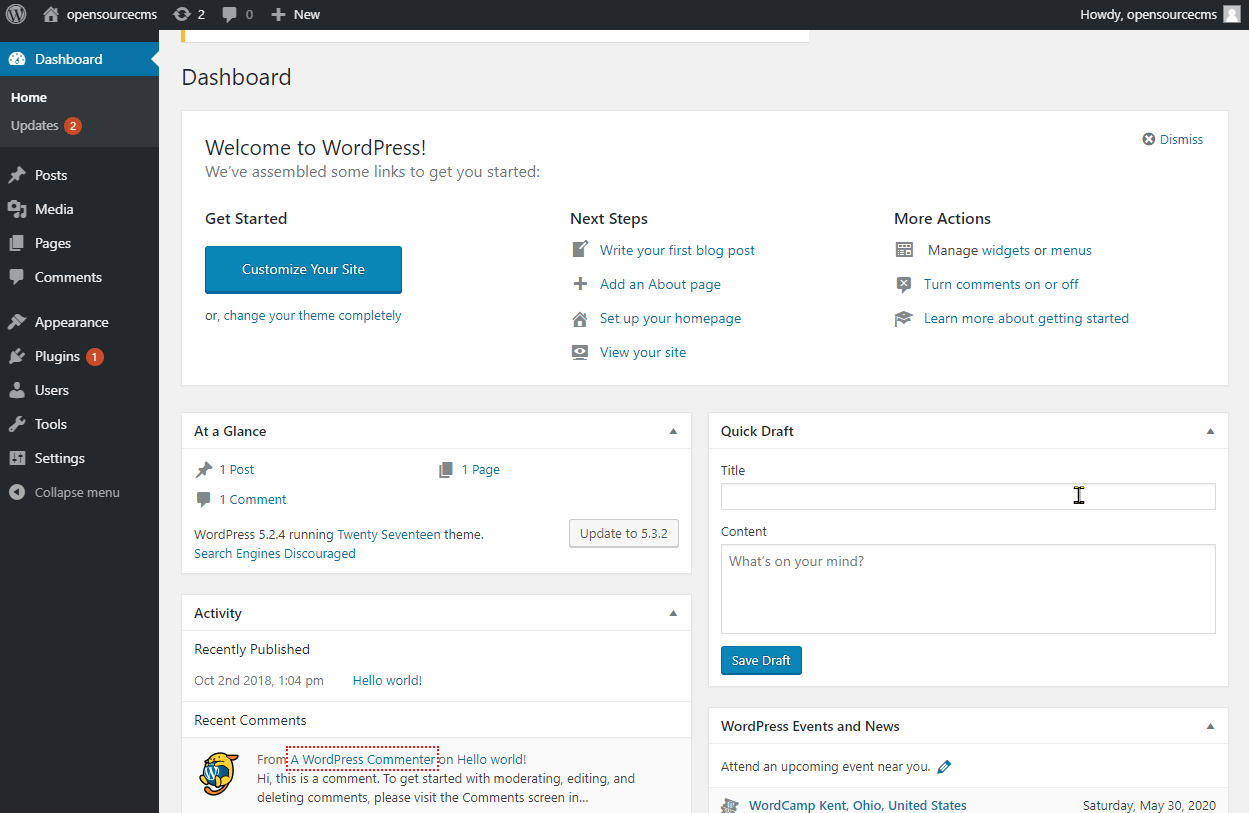
When WordPress is first installed, you have some default elements. A default theme is used and also a default page called “Sample Page.”
From the Dashboard, in the “At a Glance” section, you can see the current theme is “Twenty Seventeen” for this demo site.
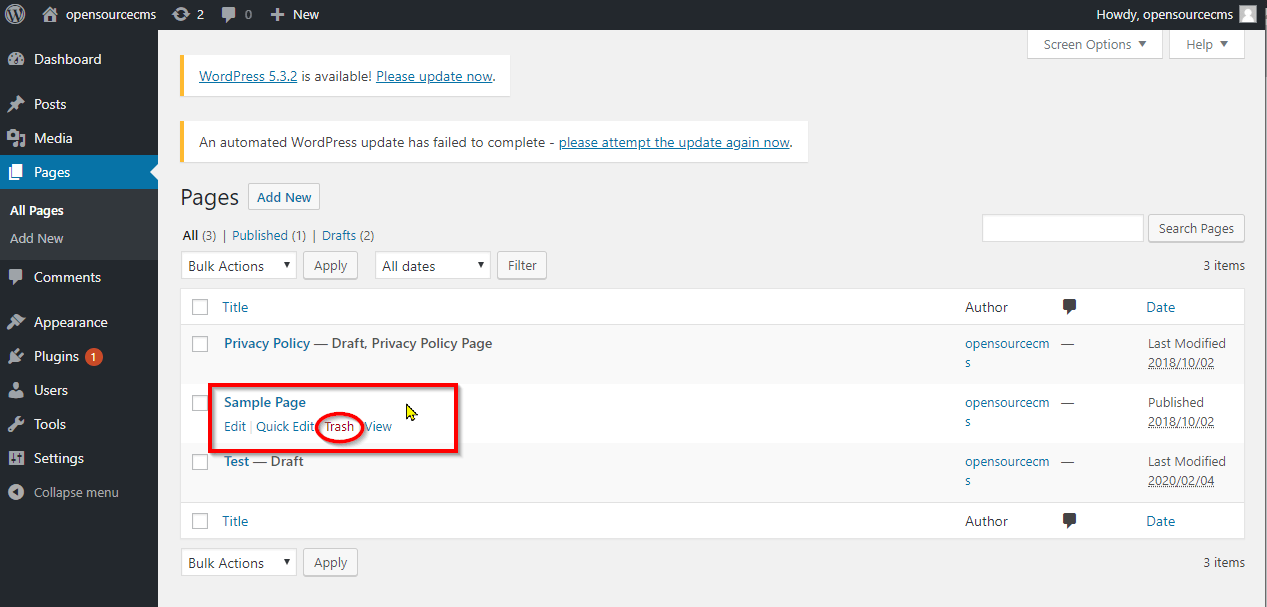
At some point, after you’ve adjusted your settings and understand their function, then you’ll want to delete the default page.
Simply hover over the page name and click “Trash.”
In addition, there’s a default post (“Hello world!”) and a default comment applied to that post.
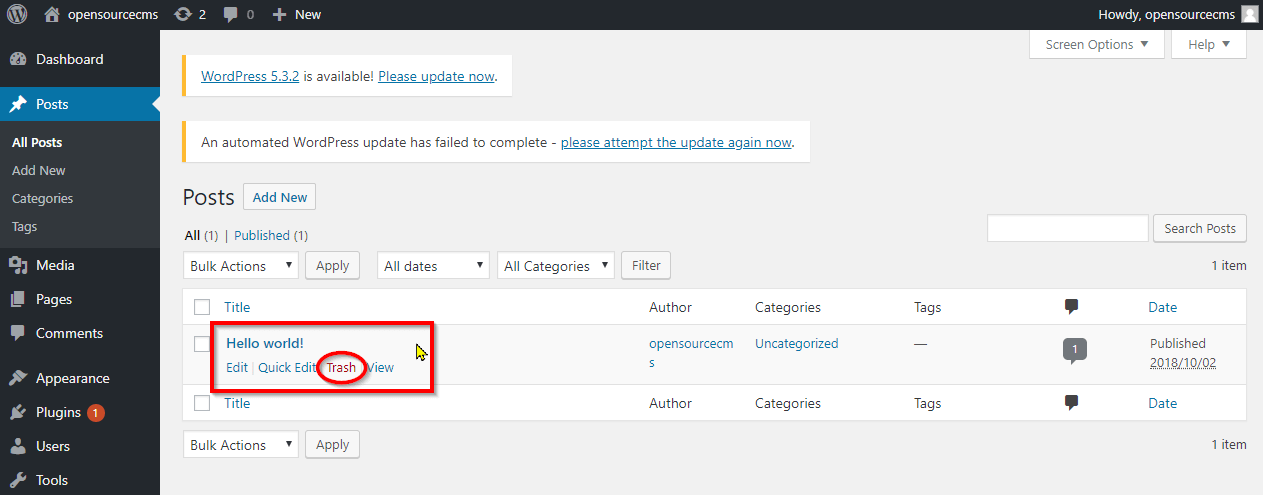
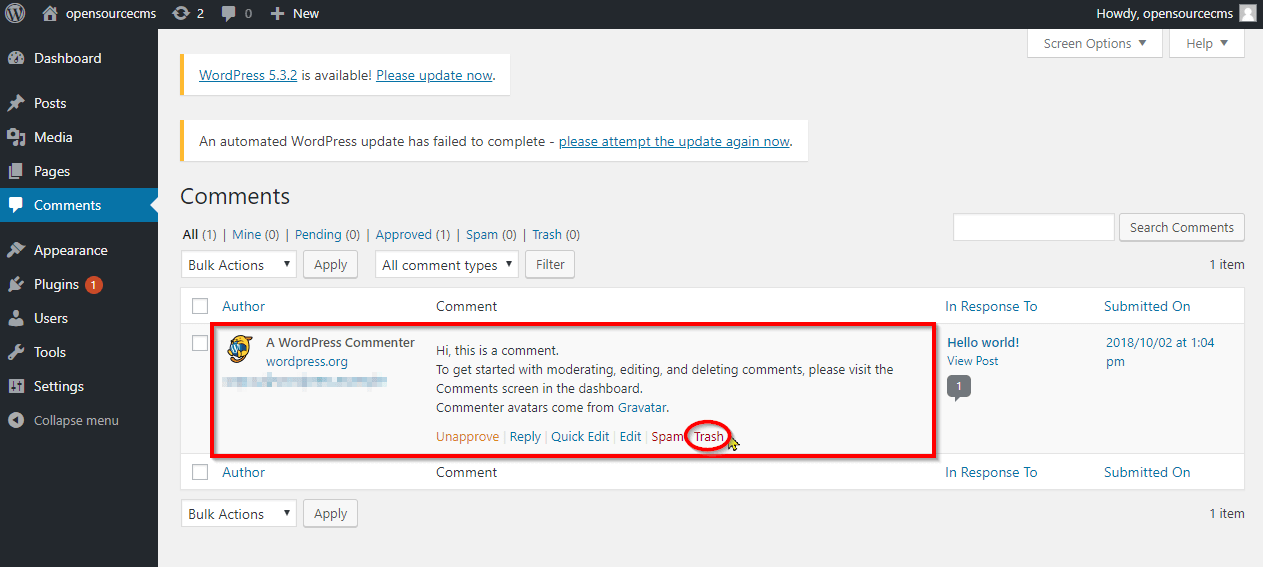
Later, you can delete the default post and comment in a similar manner as the default page. Hover over the elements and click “Trash.”
Actually, if you delete a post then all the associated comments are also deleted. You don’t have to do that separately.
These defaults are really helpful when you’re adjusting your settings to see how those elements are affected.
WordPress Settings
And now, finally, the fun part. Let’s modify some settings!
WordPress General Settings
Site Title/Tagline, Site Addresses, and Email
- Site Title – this is often entered during the WordPress installation (which is the default if you’re hosting through Bluehost). The site title will appear on the browser tab when someone views your site.
- Tagline – this is also part of the standard WordPress installation through Bluehost.
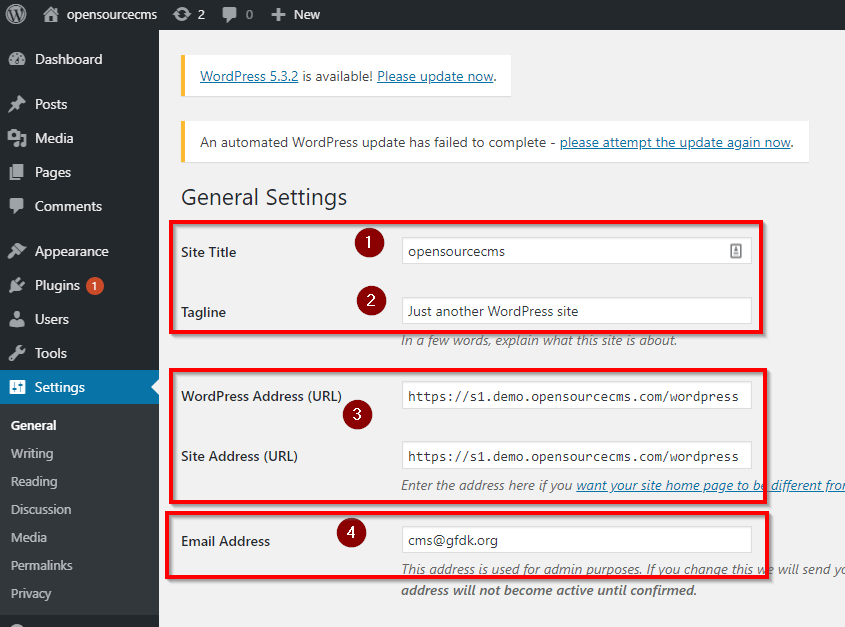
3. The WordPress Address (URL) and Site Address (URL) should match. And both of those should match the domain name you purchased.
4. Email Address – change this to a “business” address. This is the email that will be notified whenever someone comments on a post.
NOTE: The email address must exist before you add it here as a confirmation email will be sent.
Formatting
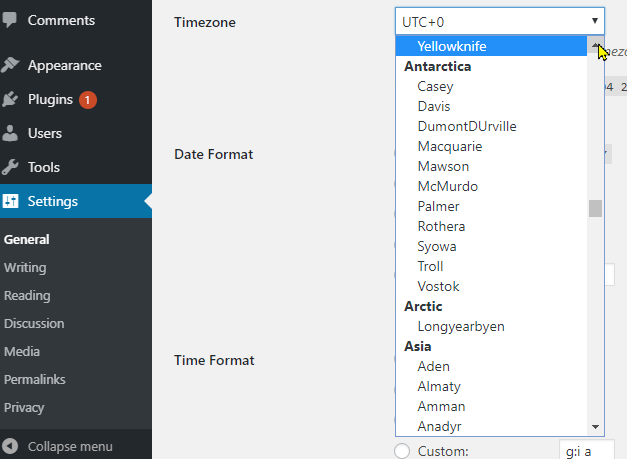
A. Timezone – choose your city/timezone from the drop-down.
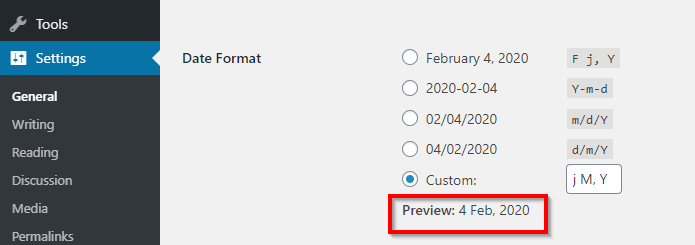
B. Date Format – you can choose how you want the date displayed on your site. If you choose “Custom” then you must include the string format. The WordPress site provides an explanation of all these formats.
But, the basics are:
- l (lower-case L) = day of the week (full name)
- F (upper-case F) = name of the month (full name)
- j (lower-case J) = day of the month
- Y (upper-case Y) = year displayed in four (4) digits
You’ll see the results in the “Preview:” underneath the selections.
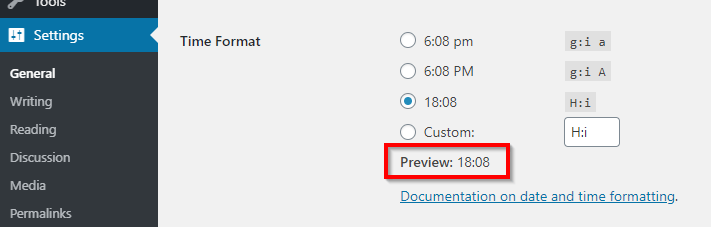
C. Time Format – you can also choose your time format. Again, there’s a custom option with a preview displayed.
If you click on the “Documentation on date and time formatting” link, you’ll be taken directly to the WordPress site with the formatting explanations.
Bluehost Settings
1. Bluehost Auto Update Manager – if you are hosted through Bluehost then you’ll have some additional settings. These are designed to keep you up-to-date so I recommend ensuring they’re all enabled (that “On” is selected).
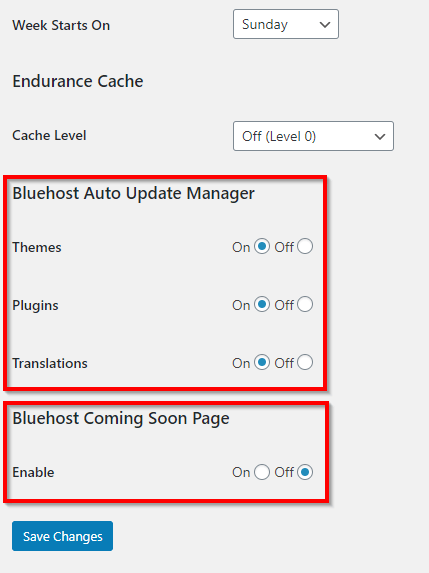
2. Bluehost Coming Soon Page – this is enabled if you haven’t “launched” yet (you’re not live to the public)
WordPress Reading Settings
The reading settings are accessed from the left vertical navigation panel, Settings -> Reading.
1. Homepage – you have two typical choices for what a viewer sees when they first access your site: static homepage vs. dynamic list of latest posts.
A static homepage is customized to display the elements you want your viewers to see. While a dynamic list of posts, a news magazine style view, displays posts in chronological order, newest first.
On my site, I use a static homepage. Whereas, Mashable or Wired for example, use a magazine style.
The default WordPress installation is to display your latest posts – “magazine” style. If you want a static homepage then:
A. Create a homepage – take some time to figure out how you want your homepage to look (layout, images, format, etc.) then create that page
B. In Settings -> Reading, in the “Your homepage displays” section, select the “A static page” radio button and from the “Homepage:” drop-down, select the new page you created (you could choose a “Posts page:” instead)
NOTE: You do NOT want to mimic the screenshot.
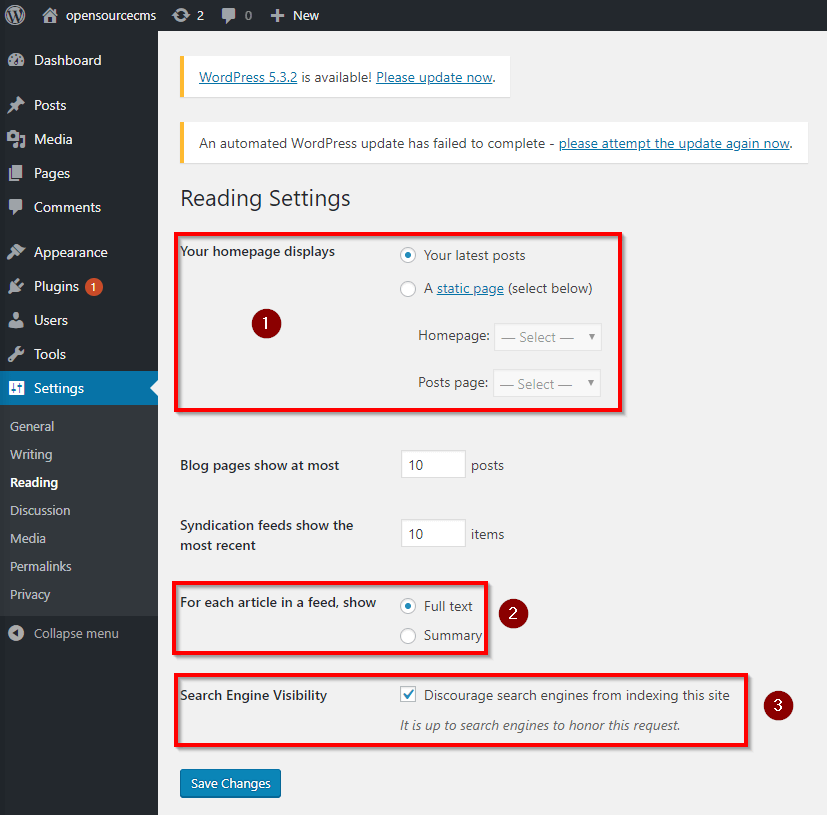
2. Feed – in section “For each post in a feed, include” (or “For each article in a feed, show” on older WordPress versions) should be set to “Summary.” This way your RSS feed (something that might be important to you later) will only show a snippet of your post instead of the full text. So you do NOT want to mimic the screenshot.
3. Search Engine Visibility – if you want people to find you then ensure this checkbox is NOT selected. You WANT search engines to index your site. So you do NOT want to mimic the screenshot.
WordPress Discussion Settings
The discussion settings are accessed from the left vertical navigation panel, Settings -> Discussion.
Posts and Comments
1. Pingbacks and trackbacks – these are notifications that show up in your comment moderation feed whenever someone links to your blog. But they present a known security risk, so ensure this box is NOT selected.
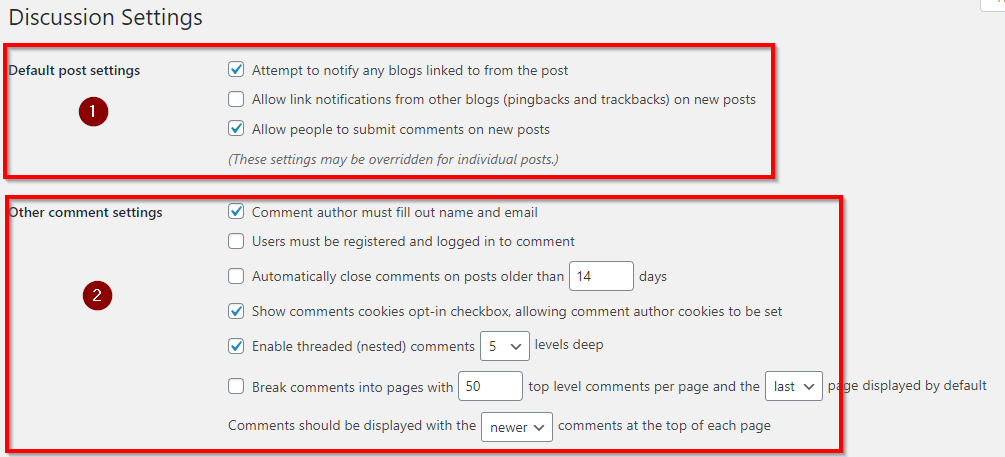
2. Enable the comments cookies opt-in – with GDPR (General Data Protection Regulation) and CCPA (California Consumer Privacy Act), it’s best to provide options to your viewers
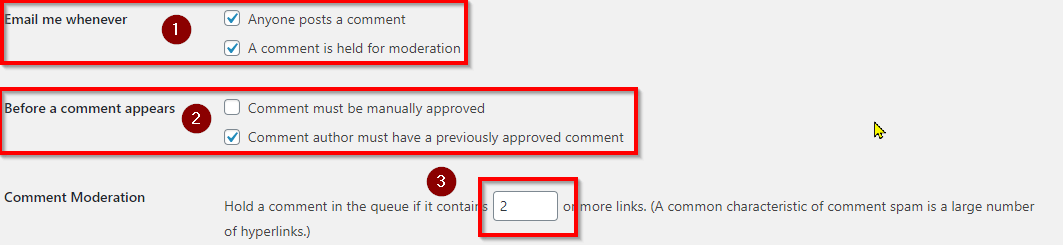
Email and Comments
For the general email and comments, I suggest you maintain the defaults. Basically, ensure your settings match the screenshot below.
Avatar
You have the option to display avatars – images people use to represent themselves. Personally, I’ve chosen to disable this feature, primarily due to the potential resource drain.
With this option enabled, websites often take longer to load. I prefer a more responsive site so I’ve disabled the feature. You’ll need to decide for yourself which you prefer.
WordPress Media Settings
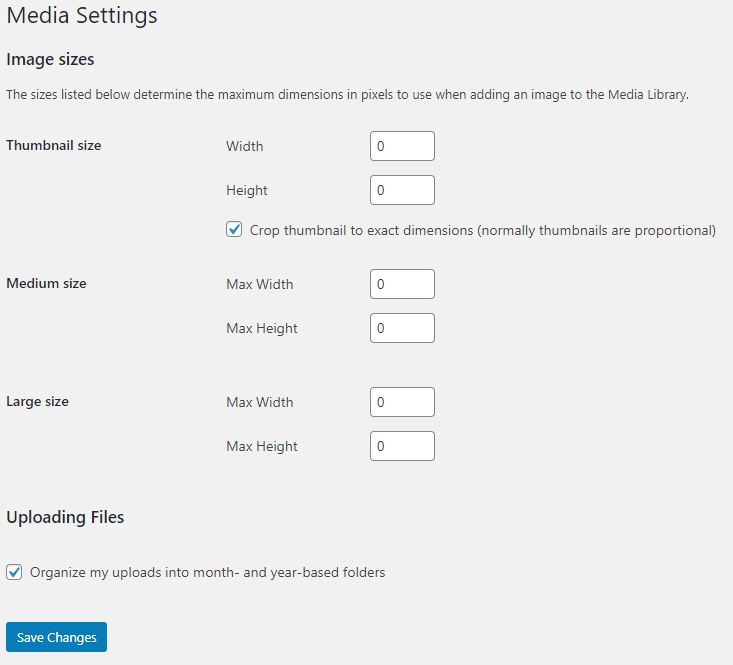
The media settings are accessed from the left vertical navigation panel, Settings -> Media.
By default, WordPress will create multiple sizes of every image you upload to your site. This is to accommodate the different locations where the images could be placed.
This adds a lot of files to your website. And images take up a lot of space and can cause performance issues.
To fix this, go to Settings -> Media and set all the widths and heights to zero (0).
WordPress Permalinks Settings
The permalinks settings are accessed from the left vertical navigation panel, Settings -> Permalinks.
Permalinks settings determine the URL used for your posts. You want to avoid the URL being too long as that’s not easy to remember for your viewers. But you also want the URL to be optimized for search engines so people can find it.
Another factor is dates. If you use a date in a post permalink (the URL) then your post is forever tagged with that date. So, even if you update a post with current information, a viewer may think it’s outdated because of the URL.
The default permalink is: “http://yoursite.com/p=123” (the number after the p is an ID reference). But this format does not help search engines nor your viewers find your post.
A permalink should NEVER be changed once there’s content on your website.
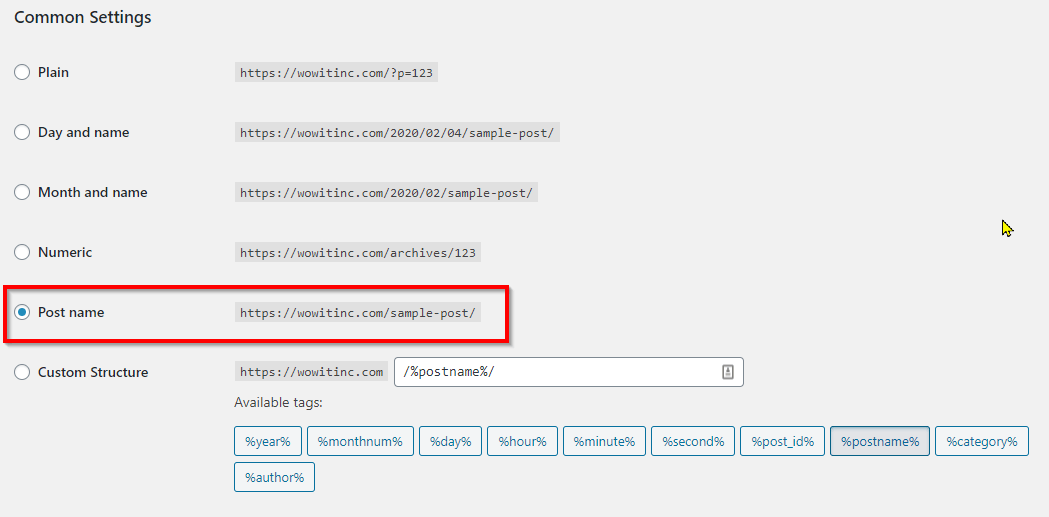
I recommend you choose “Post name” for your permalink structure instead. This is, by far, the most common choice for bloggers.
NOTE: You need to make this change BEFORE you add real content to your site. A permalink should NEVER be changed once there’s existing content (without serious consideration). As that would result in all the search engines starting from scratch to rank your site.
WordPress Users
The user settings are accessed from the left vertical navigation panel under Users.
If you will have a team of people involved in updating your website content, then you’ll want each person to have a unique WordPress userid.
Some of the information in this section could be displayed on your site publicly. So you need to read it carefully before applying any updates.
WordPress Themes
WordPress themes control the layout of your website – where and how information appears. As I mentioned earlier in this article, while you’re figuring out how WordPress works you might want to stick to the default theme.
I used a free theme for almost one year. But, currently, I’m using a theme purchased from Elegant Themes (I use the Divi Builder with the Extra theme).
You access themes through the Appearance setting: Appearance -> Themes. You’ll see all the themes currently installed on your site. Plus you’ll see which theme is active – the one currently being used (in the red box below).
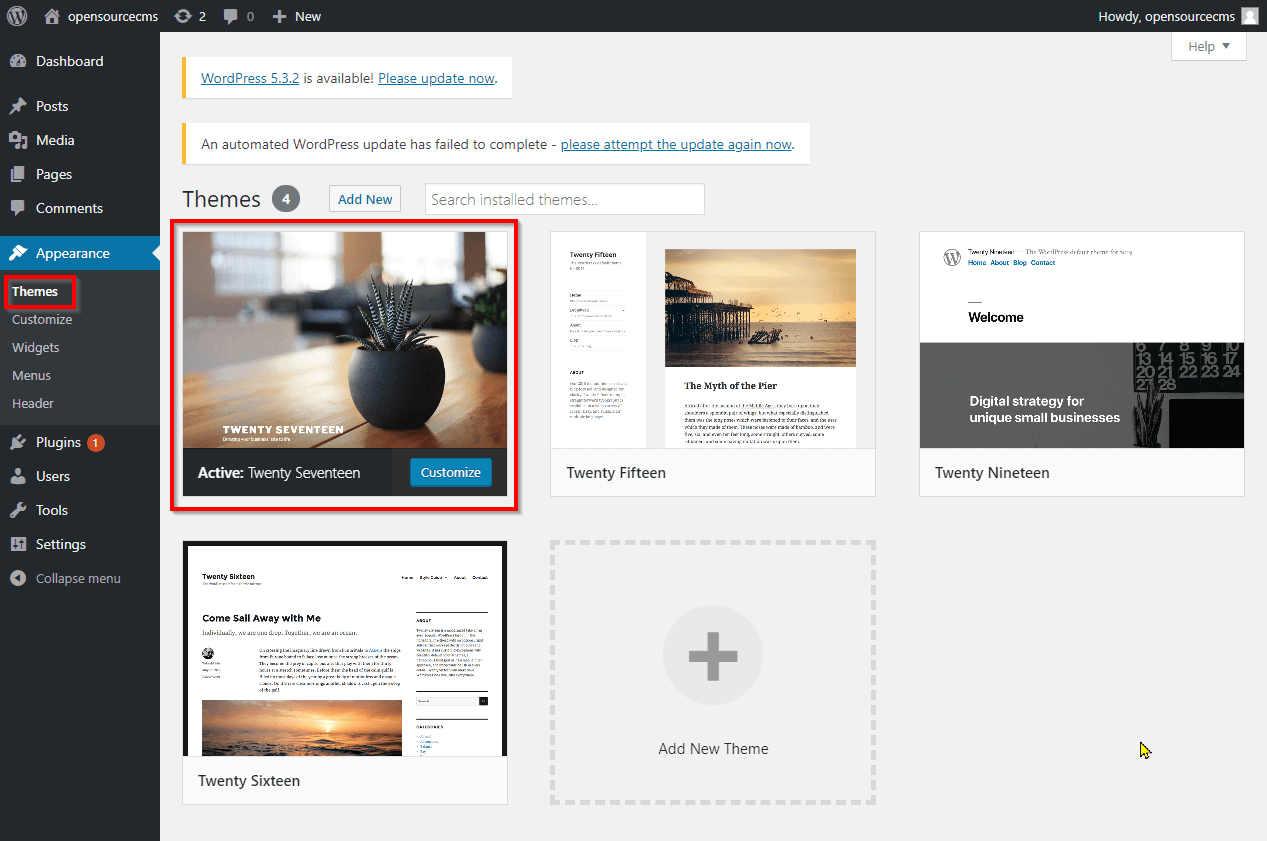
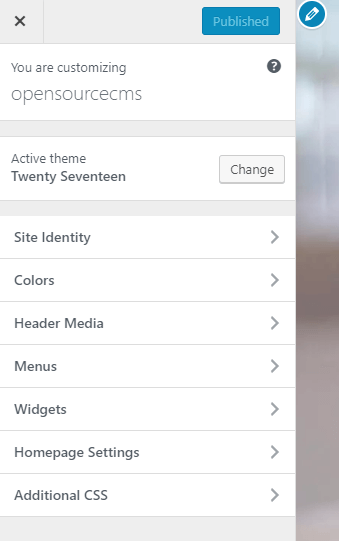
You can customize many of the theme options. Any available options are viewed (and modified) through Appearance -> Customize.
In a future article, I’ll explain how to choose a theme and how to install and customize it.
WordPress Plugins
You’ve learned that plugins can provide you with more functionality. And they’re really great if you want to avoid writing any code.
But plugins do come at a cost. More plugins mean more code to load and that could slow down your site. Also, plugins can be a potential source of viruses.
With a brand new site, I suggest you load just one (1) plugin right now. And that’s for spam protection.
WordPress loads the Akismet Anti-Spam plugin by default. And this is a really great plugin with a great reputation.
But because it’s so well-known and widely used, it also attracts the attention of a lot of hackers. So I suggest you try something that’s not as popular.
I’m quite fond of Antispam Bee and it’s also very reputable.
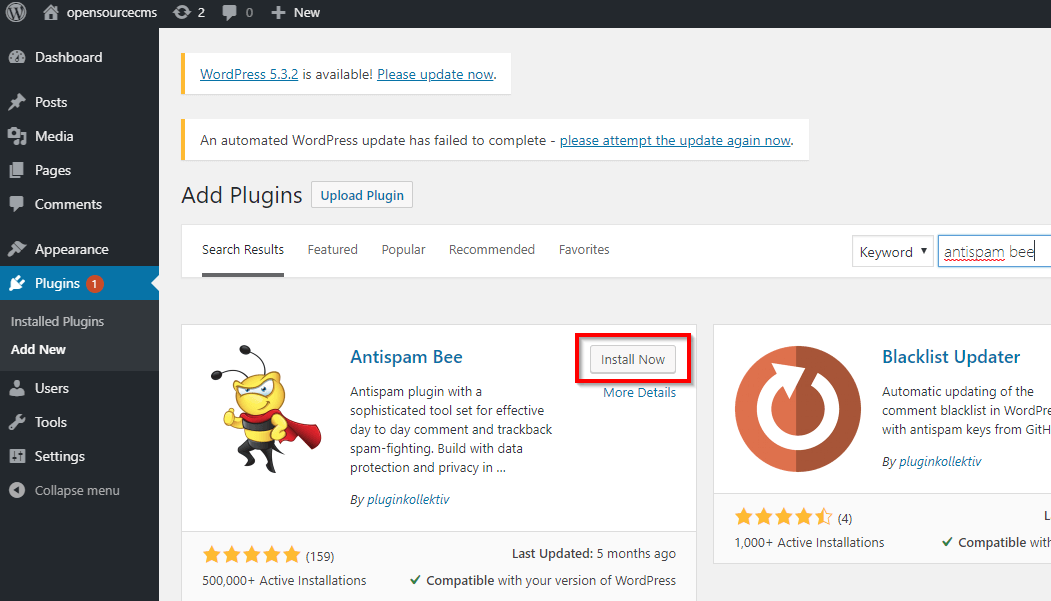
To install a plugin:
- From the left vertical navigation panel, choose Plugins -> Add New
- On the right side of the screen, next to the “Keyword” drop-down is the search field. Enter “antispam bee” and hit enter
- When you locate the results for “Antispam Bee” click on “Install Now” and follow the prompts.
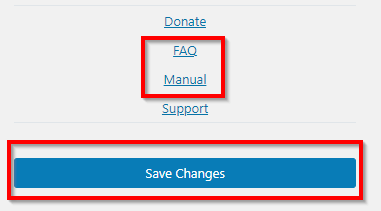
You’ll find all your installed plugins through Plugins -> Installed Plugins. Click on “Settings” to update the details.

At the bottom of the settings page, you’ll find links to Frequently Asked Questions (FAQ) and a manual. Use these to adjust the settings to suit your needs.
But be certain to click “Save Changes” when you’re finished.
Like This Post? Put a Pin On It!
Did you find this article useful and helpful?
Share this WOWIT post on social media!
Have some suggestions of your own?
Click the Submit Comment button below to let us know!
Want More?
Would you like to learn more about this topic? Or perhaps explore some other topics? Choose from one of the categories below to see more:
Subscribe to our newsletter to have information delivered right to your inbox.